
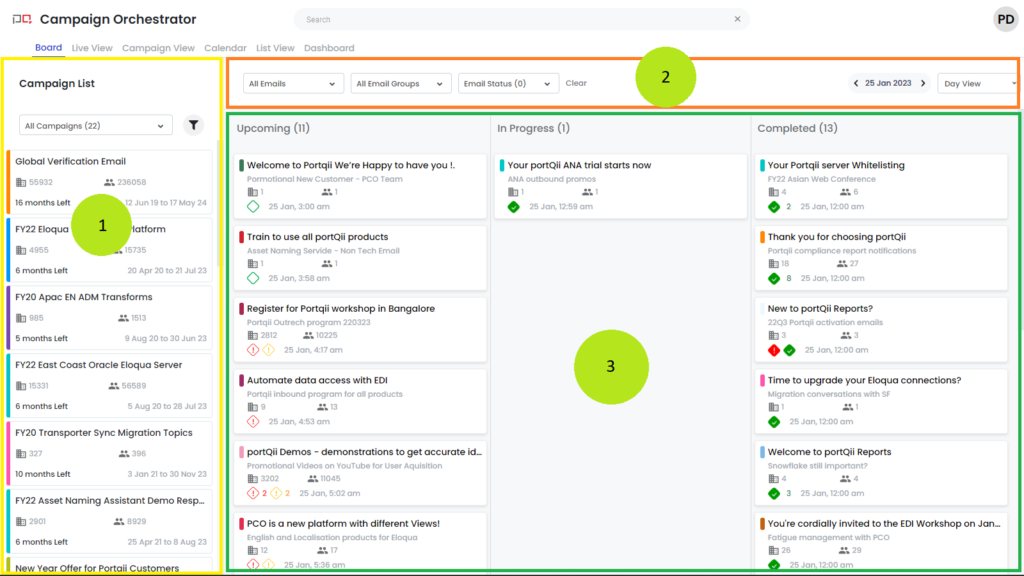
The Board View has three main sections:
- The Campaign section on the Left
- The Email Filtering section on the Top, and
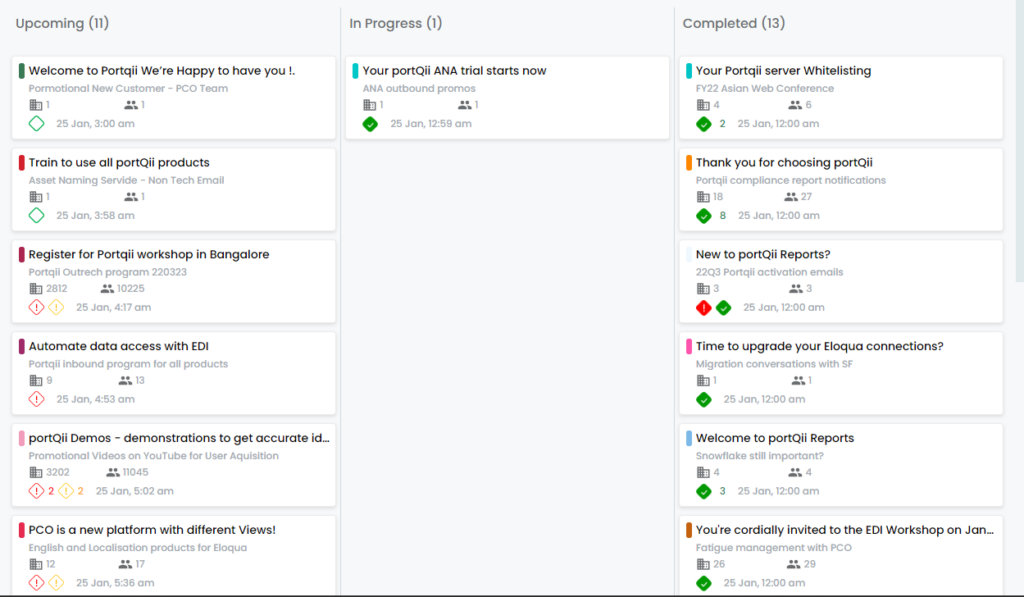
- The Emails section on the right (with three columns)
- Upcoming
- In Progress
- Completed

Highlights of the View: #
- Email cards (instances) are displayed in a Kanban board
- Upcoming: A card appears in this section, if this batch of emails is not due for more than an hour at the time of the viewing
- Completed: A card appears here if this batch has been completed more than an hour ago
- In Progress: These cards are either sending out emails; or it’s not yet been an hour since completion; or will start in less than an hour.
Benefits: #
- The user can see a clear categorization of the emails that are upcoming, processing and completed.
- Number of accounts and contacts an email is intended to is found on the email cards.
- The user, upon landing on this view, can see if the contacts on the emails are in the violation of the touch governance rules.
The Campaign Section on the Left (Marked 1) #
This section on the left, lists campaigns that are active today (whichever day you open this page). If a campaign is scheduled to send an email today, then we will find that campaign in this section. If we do not find a campaign listed here, then perhaps there is no email from that campaign scheduled for the day.
Campaign Filter #
We can use this filter to choose the campaign we want to focus on:
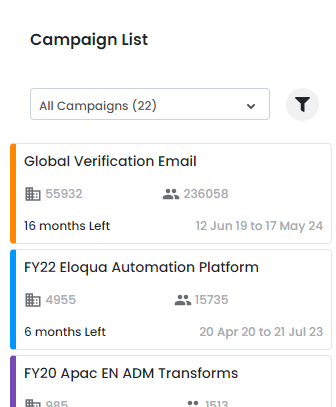
Campaign Cards #
This column carries one card for each campaign:
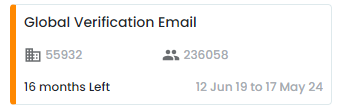
Each card carries Five data points:
- Name of the campaign
- 4915 in this case: is the number of accounts/orgs associated with the campaign.
- 15587 in this case: is the number of contacts associated with the campaign.
- 6 months left: until this campaign ends.
- 20 Apr 20 to 21 Jul 23 – the start and end date of this campaign
Color Mapping #
In addition to this, there are colors associated with each campaign – Emails from this campaign will also carry the same color, making it easy to know which email belongs to which campaign.
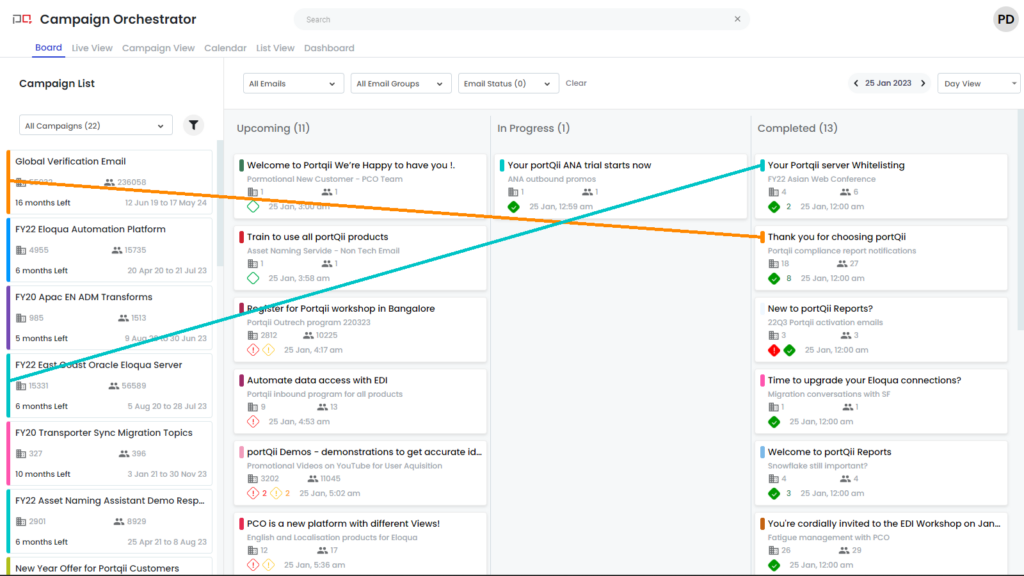
The Email Section on the Right (Marked 3) #
This section on the right, lists all the email instances of the present day.

Note: Eloqua deploys emails in batches; These deployments can span hours. It does this when the number of emails to be sent is large. PCO aggregates this email send stack into hourly chunks of email instances of the corresponding email. Each email-card is an email instance.
It has three columns:
- Upcoming
- In Progress
- Completed
Clicking on a card opens a detailed view for that card, and here, we can see all the batches that were created for an email:
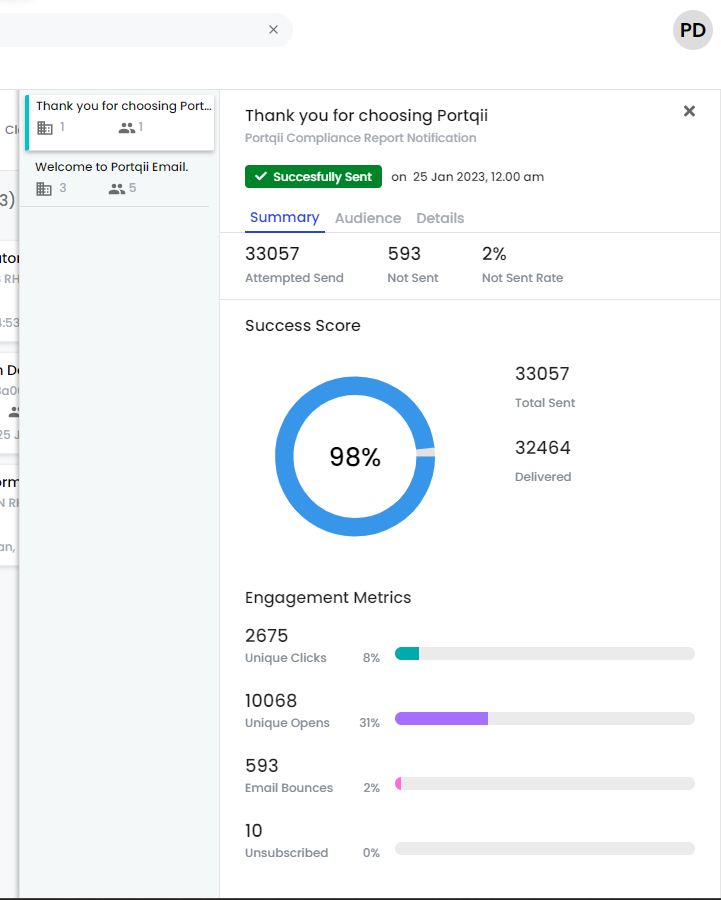
In the screen shot above, we see the detailed view. On the left, we also see other emails from the same campaign listed here that have the email sends during that hour chunk.
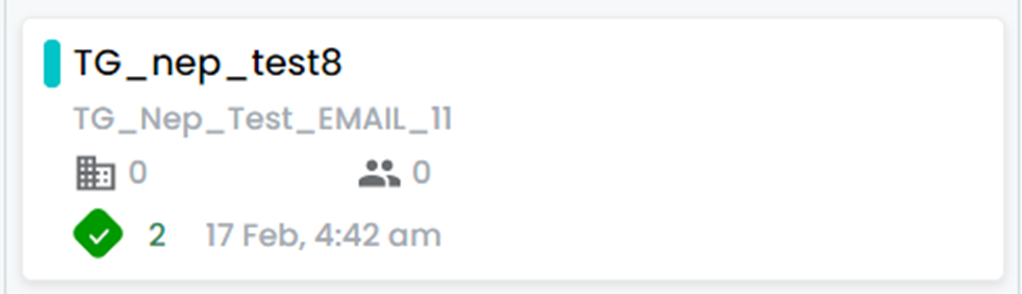
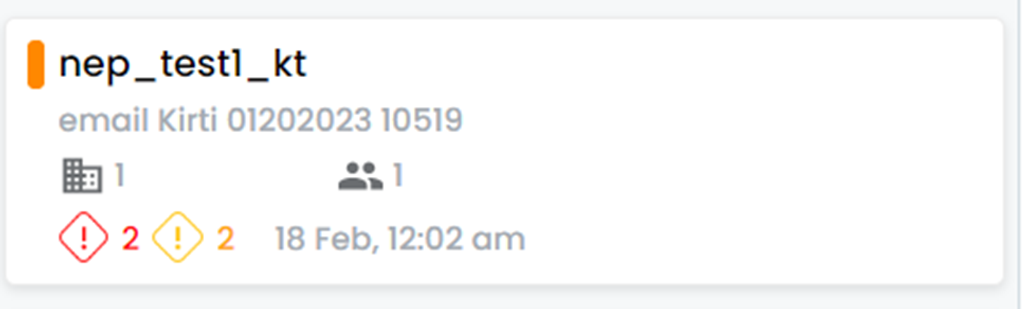
Email Cards #
Let’s look at the email card:
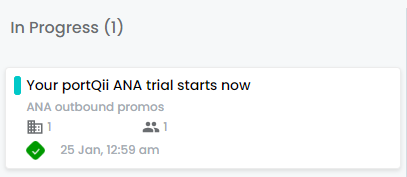
Each card has:
- Email Subject
- Asset name
- Number of Account involved.
- Number of Contacts involved.
We can recognize those easily. They are like campaign cards.
The last line in each card has indicators that can flag:
| Icon | What the Icon Means: |
|---|---|
 | Red filled rhombus: This indicates a completed email which had at least one contact that violated the touch governance (TG) rules. |
 | Yellow filled rhombus: This indicates completed email which had at least one contact that violated the overlapping rules. |
 | Green filled rhombus: This indicates completed email which had all the emails successfully sent without violating TG or overlapping rules. |
 | Red hollow rhombus: This indicates an upcoming email that has contacts which may violate the TG rules. |
 | Yellow hollow rhombus: This indicates an upcoming email that has contacts which may violate the overlapping rules. |
 | Green hollow rhombus: This indicates that the emails are being sent out – and not all emails have been sent yet. |
Here are some examples of how these Icons appear on Email cards: #
 |
 |
 |
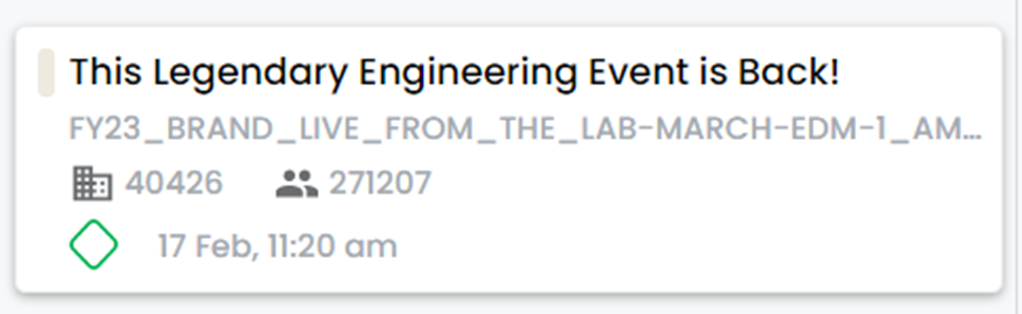 |
The last line also has the date and time for the email batch. Remember, this is not the date/time for all the emails, but just the smaller batch of emails. So, we will find another email card with nearly the same details, but with the date/time differing.
The Three Columns #
Here is how an email card appears in one of the three columns:
- Upcoming: A card appears in this section, if this batch of emails is not due for more than an hour from now
- Completed: A card appears here if this batch has been completed for more than an hour
- In Progress: These cards are either sending out emails; or it’s not yet been an hour since completion; or will start in less than an hour.

The Filter Section (Marked 2) #
Let’s talk about filters.
Some of the filters that we speak about in this section are in section 1 and some are in section 2. Let’s keep an eye on the heading to know which section the filter is in.
All these filters can refine the emails that are shown in the right section (3)
Section 2 Filters: #
- On the right of this section is a view selector:
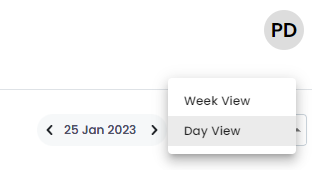
Select a Week View, or a Day View – We mostly use the day-view in our team.
- On the left, we have three filters:
- All emails – here we can select just the emails that interest us.
- All email groups – these are based on the groups created in Eloqua. If we haven’t created groups in Eloqua, we don’t see them here.
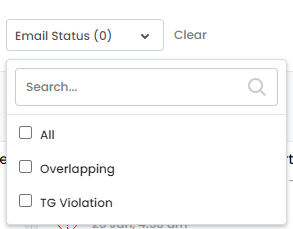
- Email Status: Here we can choose to just see email batches with overlapping or just TG (Touch Governance) violations.
Section 1 Filters: #
Campaign Filters – Campaign Name Filter #
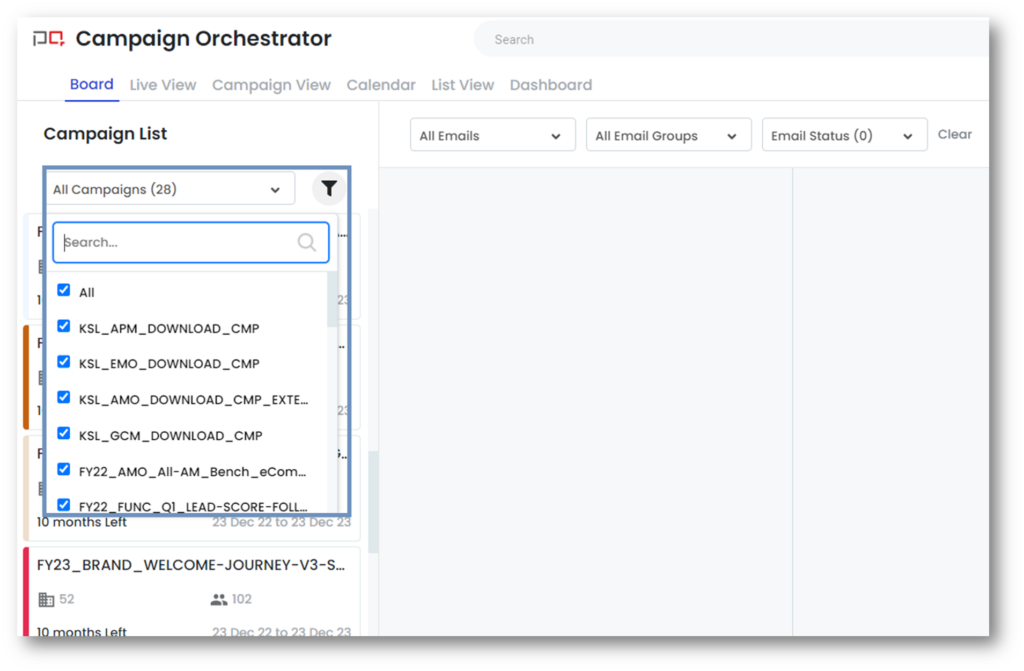
- Users can click on the All-Campaigns drop-down and select the desired campaigns and see the emails only related to those campaigns.
- This widget supports filtering and multi-selection.
Note : Campaign filters are available on all the views except the dashboards.
Campaign Filters – Advanced Campaign Filters #
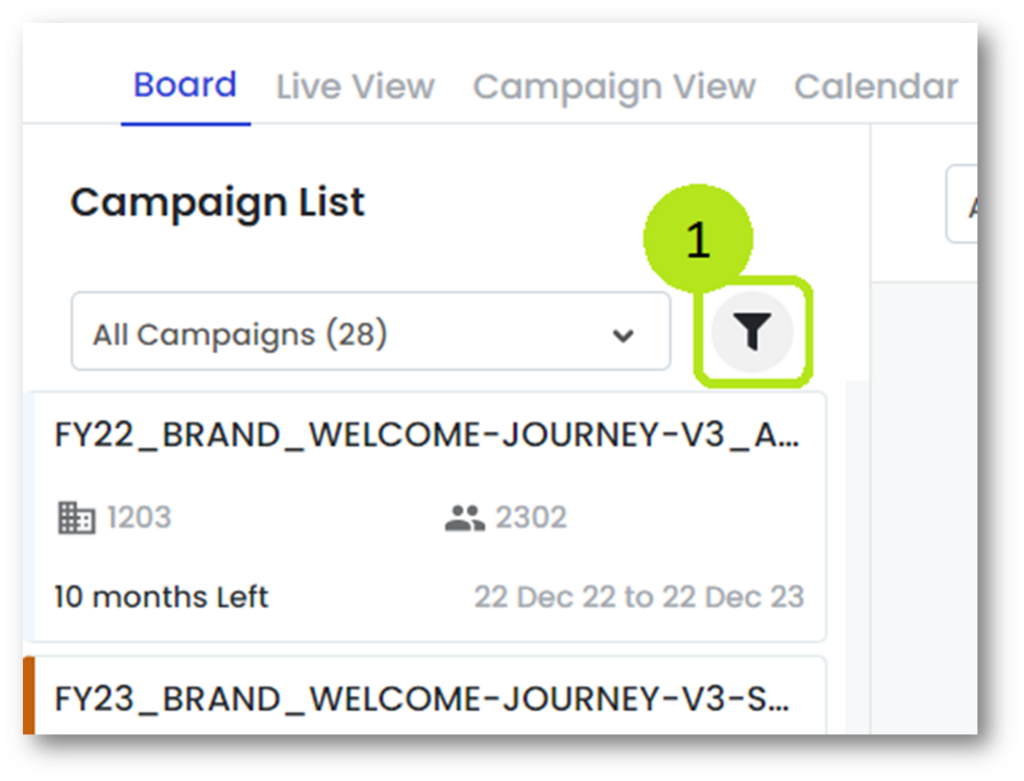 | Click on the funnel icon (Screenshot #1) |
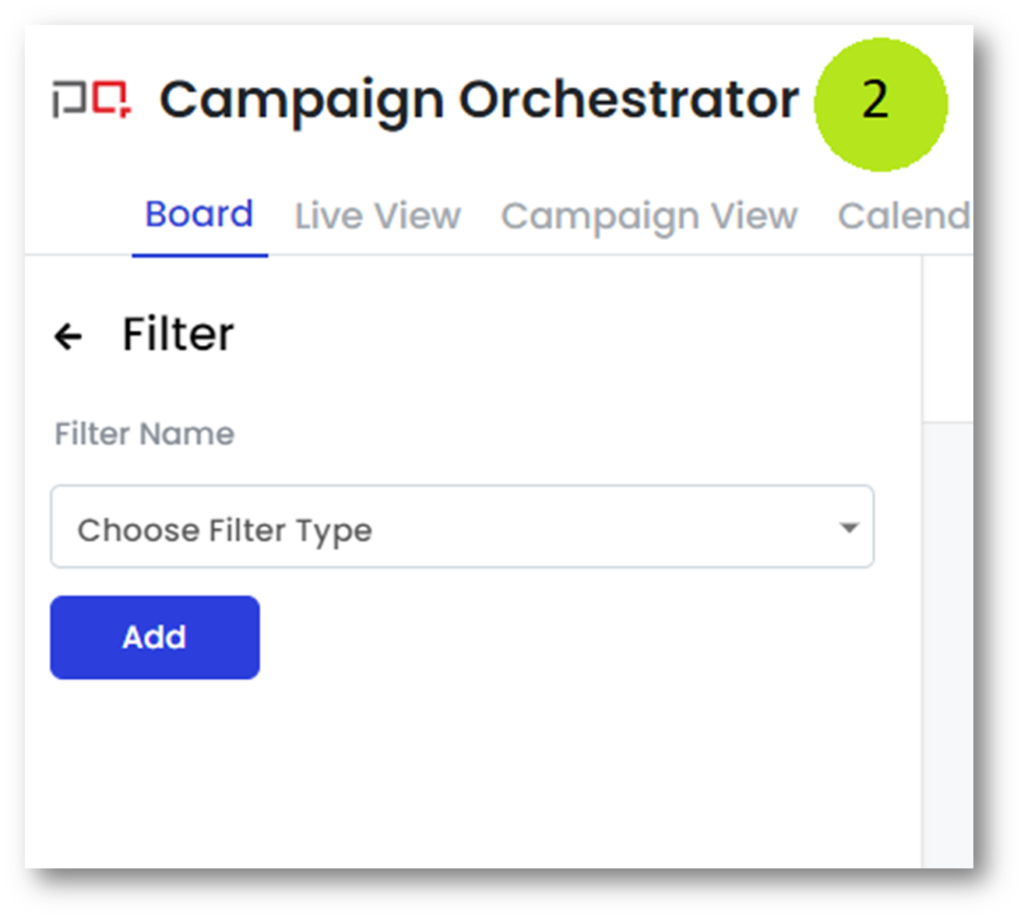 | This opens (Screenshot #2) |
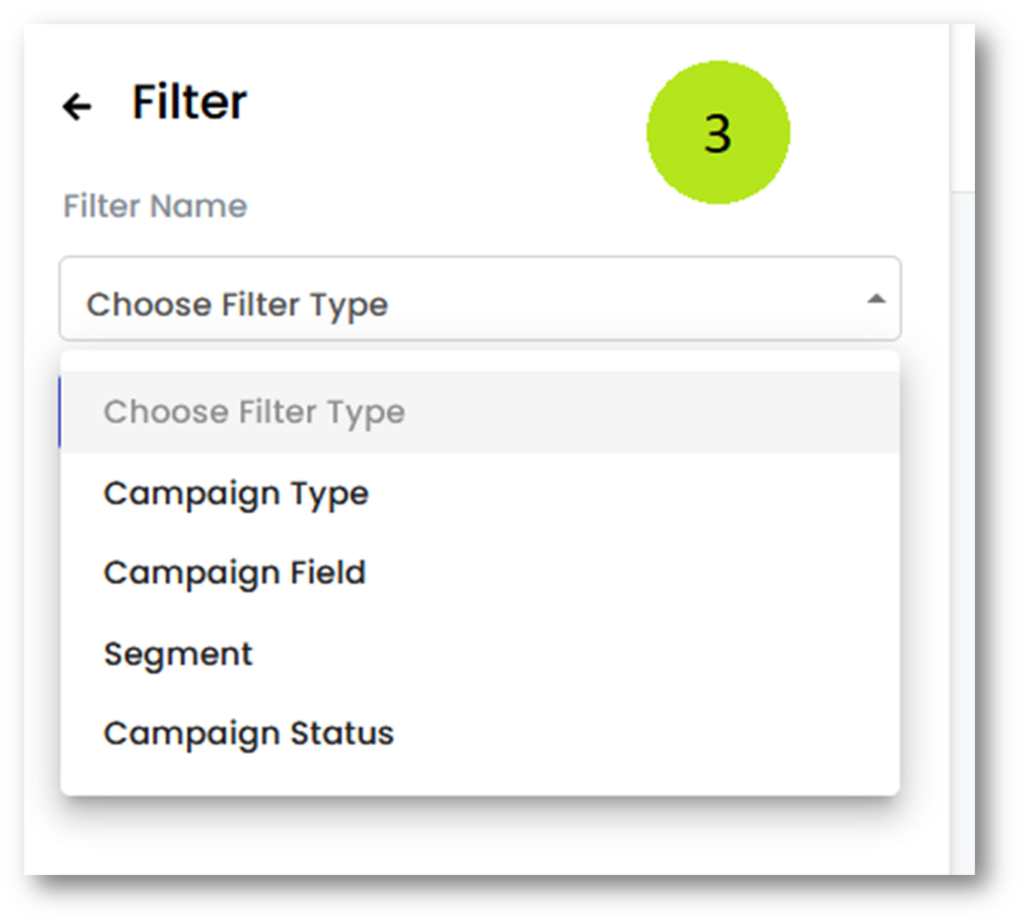 | The Choose Filter Type drop-down gives us four options: Campaign Type Campaign Field Segment Campaign Status |
These filters will be applied across all the views.
Campaign Filters – Advanced Campaign Filters – Campaign Type #
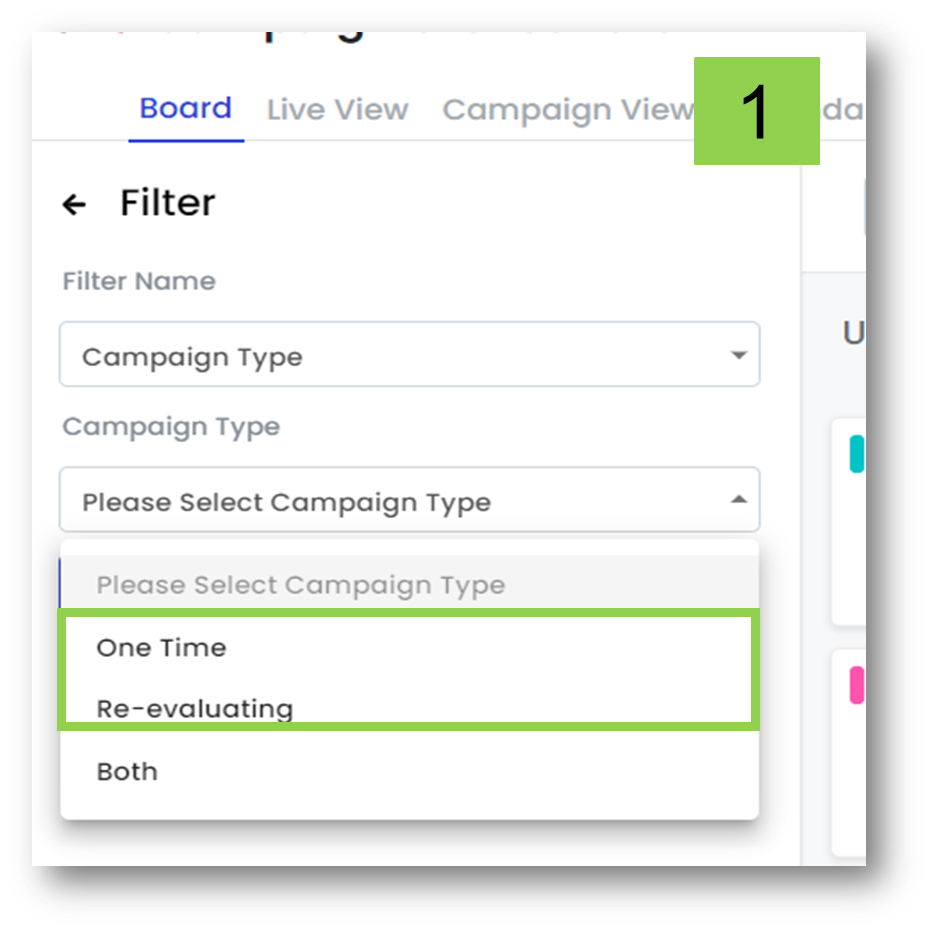 | Campaigns in PCO are classified into two types. Re-evaluating: * If the campaign is marked to “Allow the contacts to enter more than once” If the campaign has a re-evaluating segment * If the campaign has a form input step * If the campaign meets any one of the above criteria, then it is marked as ‘Re-evaluating’. One Time: If the campaign meets none of the above conditions, then it is marked as One Time. |
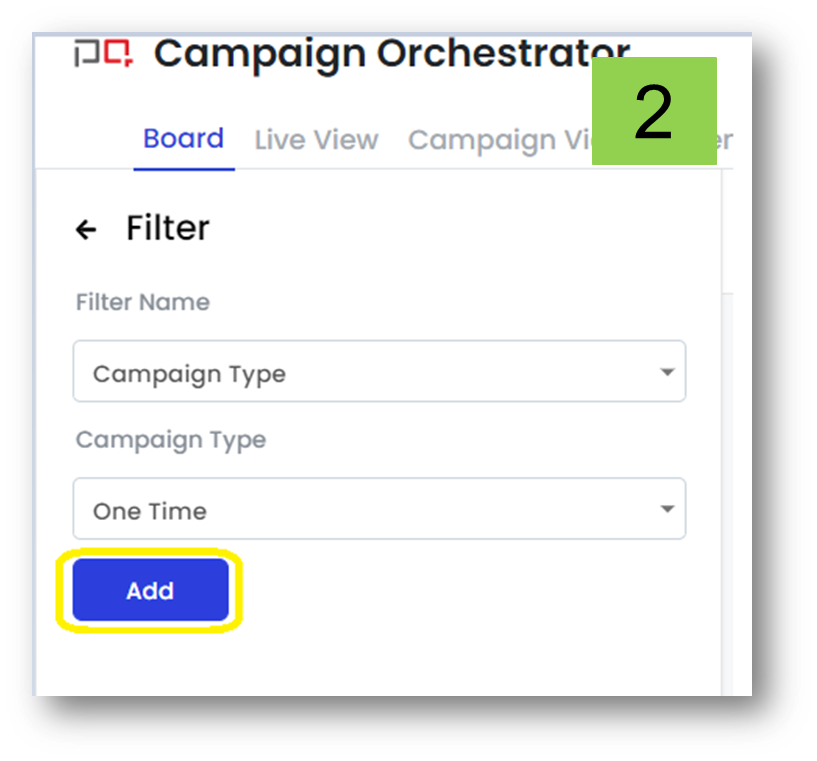 | Choose either “One Time” or “Re-evaluating” and click on the Add button (Shown in screenshot 2) |
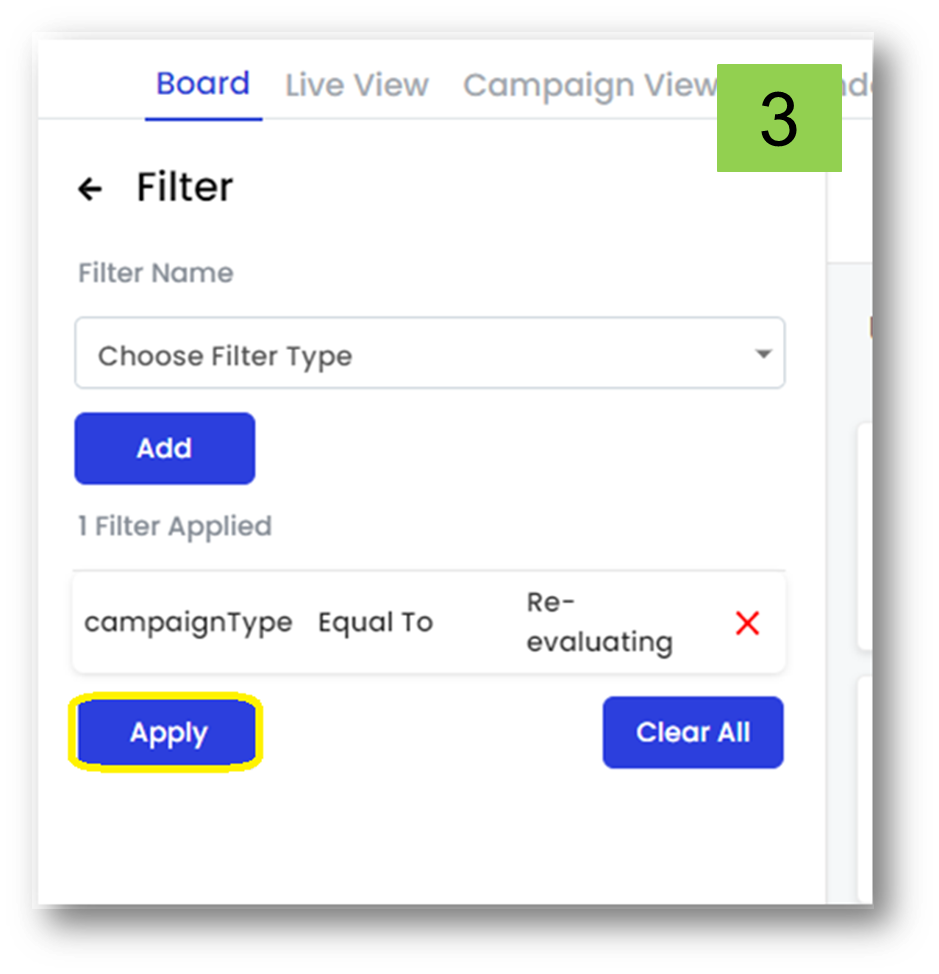 | Once the filters are added, click on the Apply button (Shown in Screenshot 3). |
Campaign Filters – Advanced Campaign Filters – Campaign Fields #
 | We can use Campaign Fields as a filter Here (screenshot) we are filtering campaigns with the ‘Campaign Tactic’ campaign field set to Advert Paid Search |
Campaign Filters – Advanced Campaign Filters – Segments #
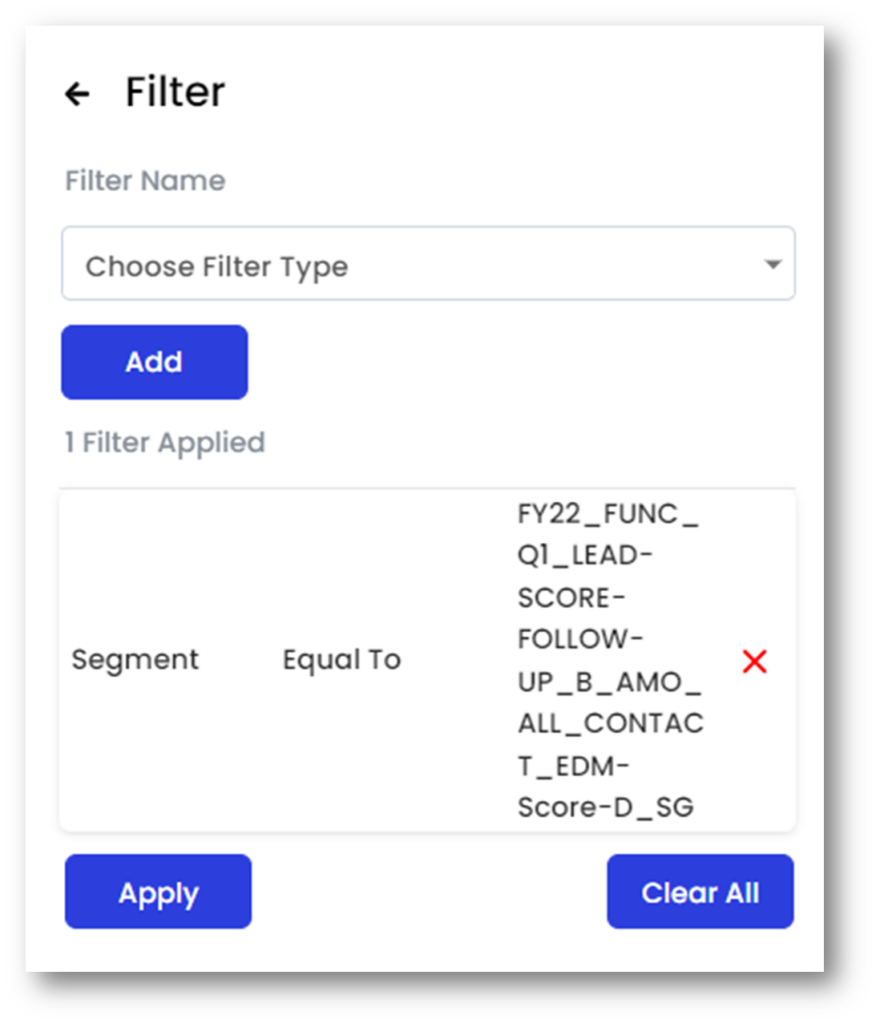 | We can use Segments as a filter Here (screenshot) we are filtering all the campaigns that use the segment : FY22_FUNC_Q1_LEAD-SCORE-FOLLOW-UP_B_AMO_ALL_CONTACT_EDM-Score-D_SG |
Campaign Filters – Advanced Campaign Filters – Campaign Status #
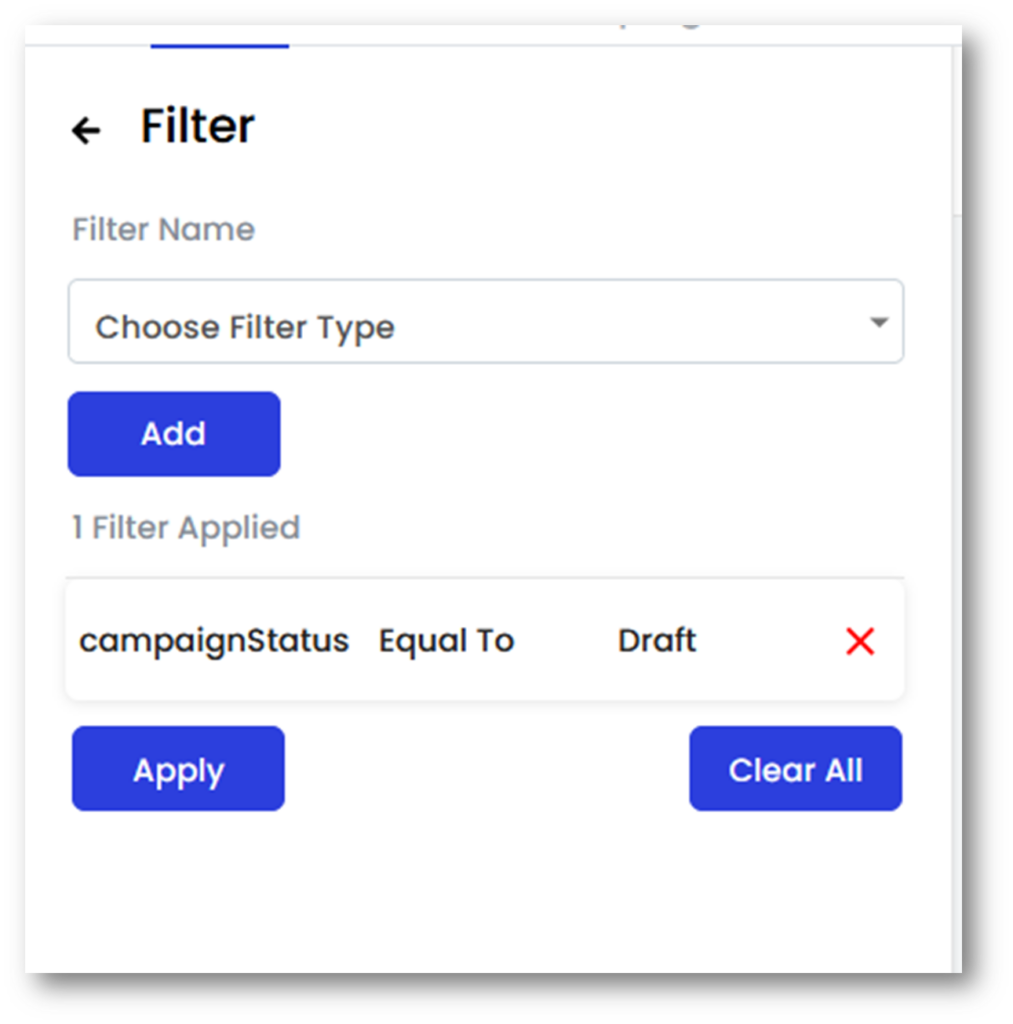 | We can use Campaign Status as a filter. Here (screenshot) we are filtering all the campaigns that are in Draft status: |
Section 2 Filters: #
Email Filters – Email Name Filter #
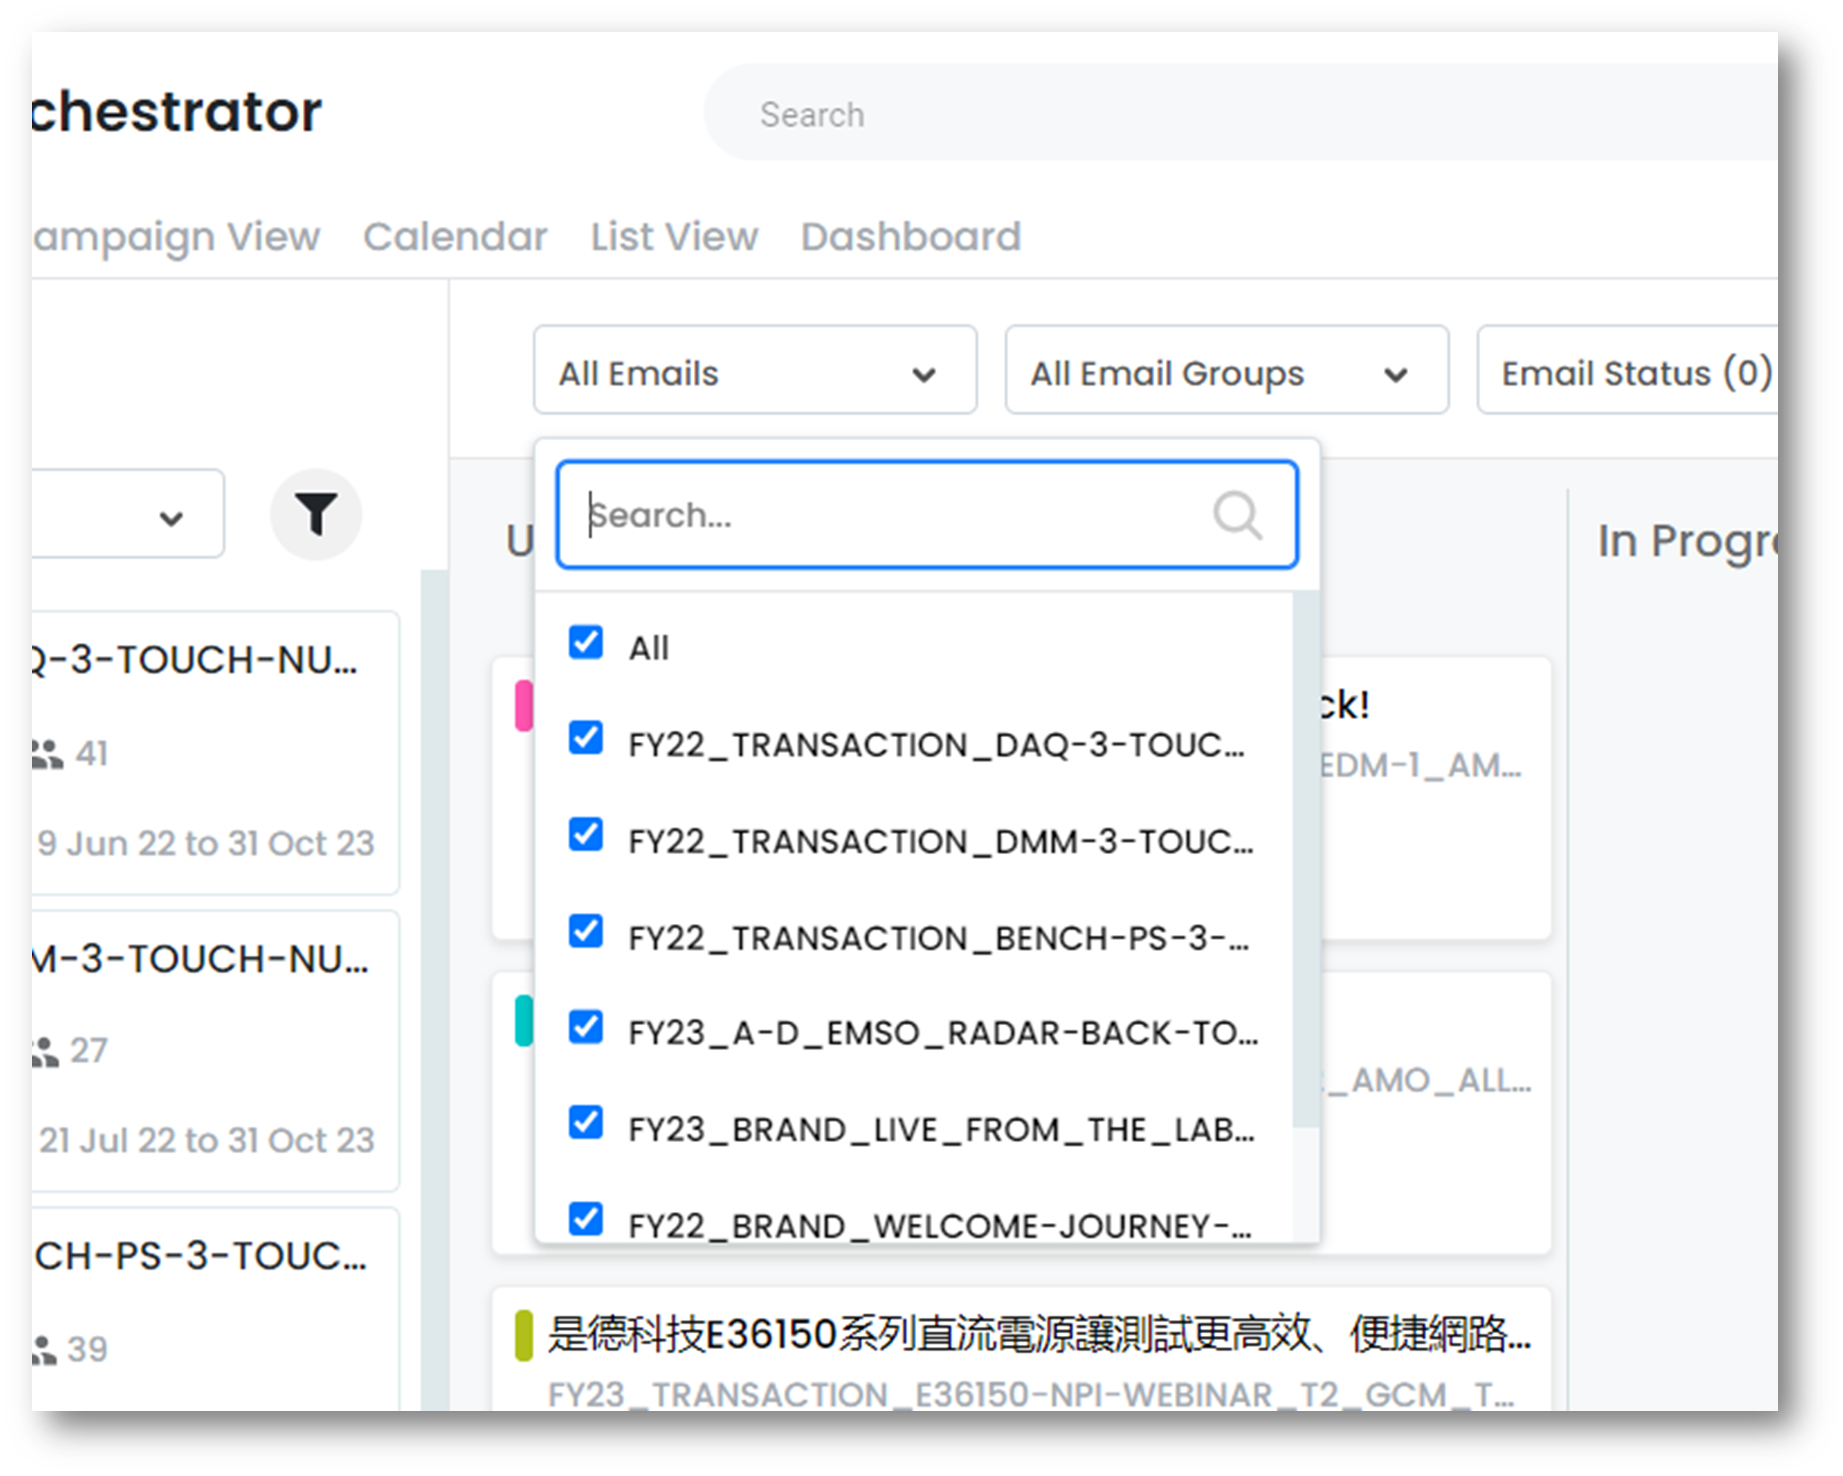 | * We can also use Email Names as filters * PCO (screenshot) supports multi-selection here. Note: Email filters are available on: Board View, Live View and Calendar Views |
Email Filters – Email Group Filter #
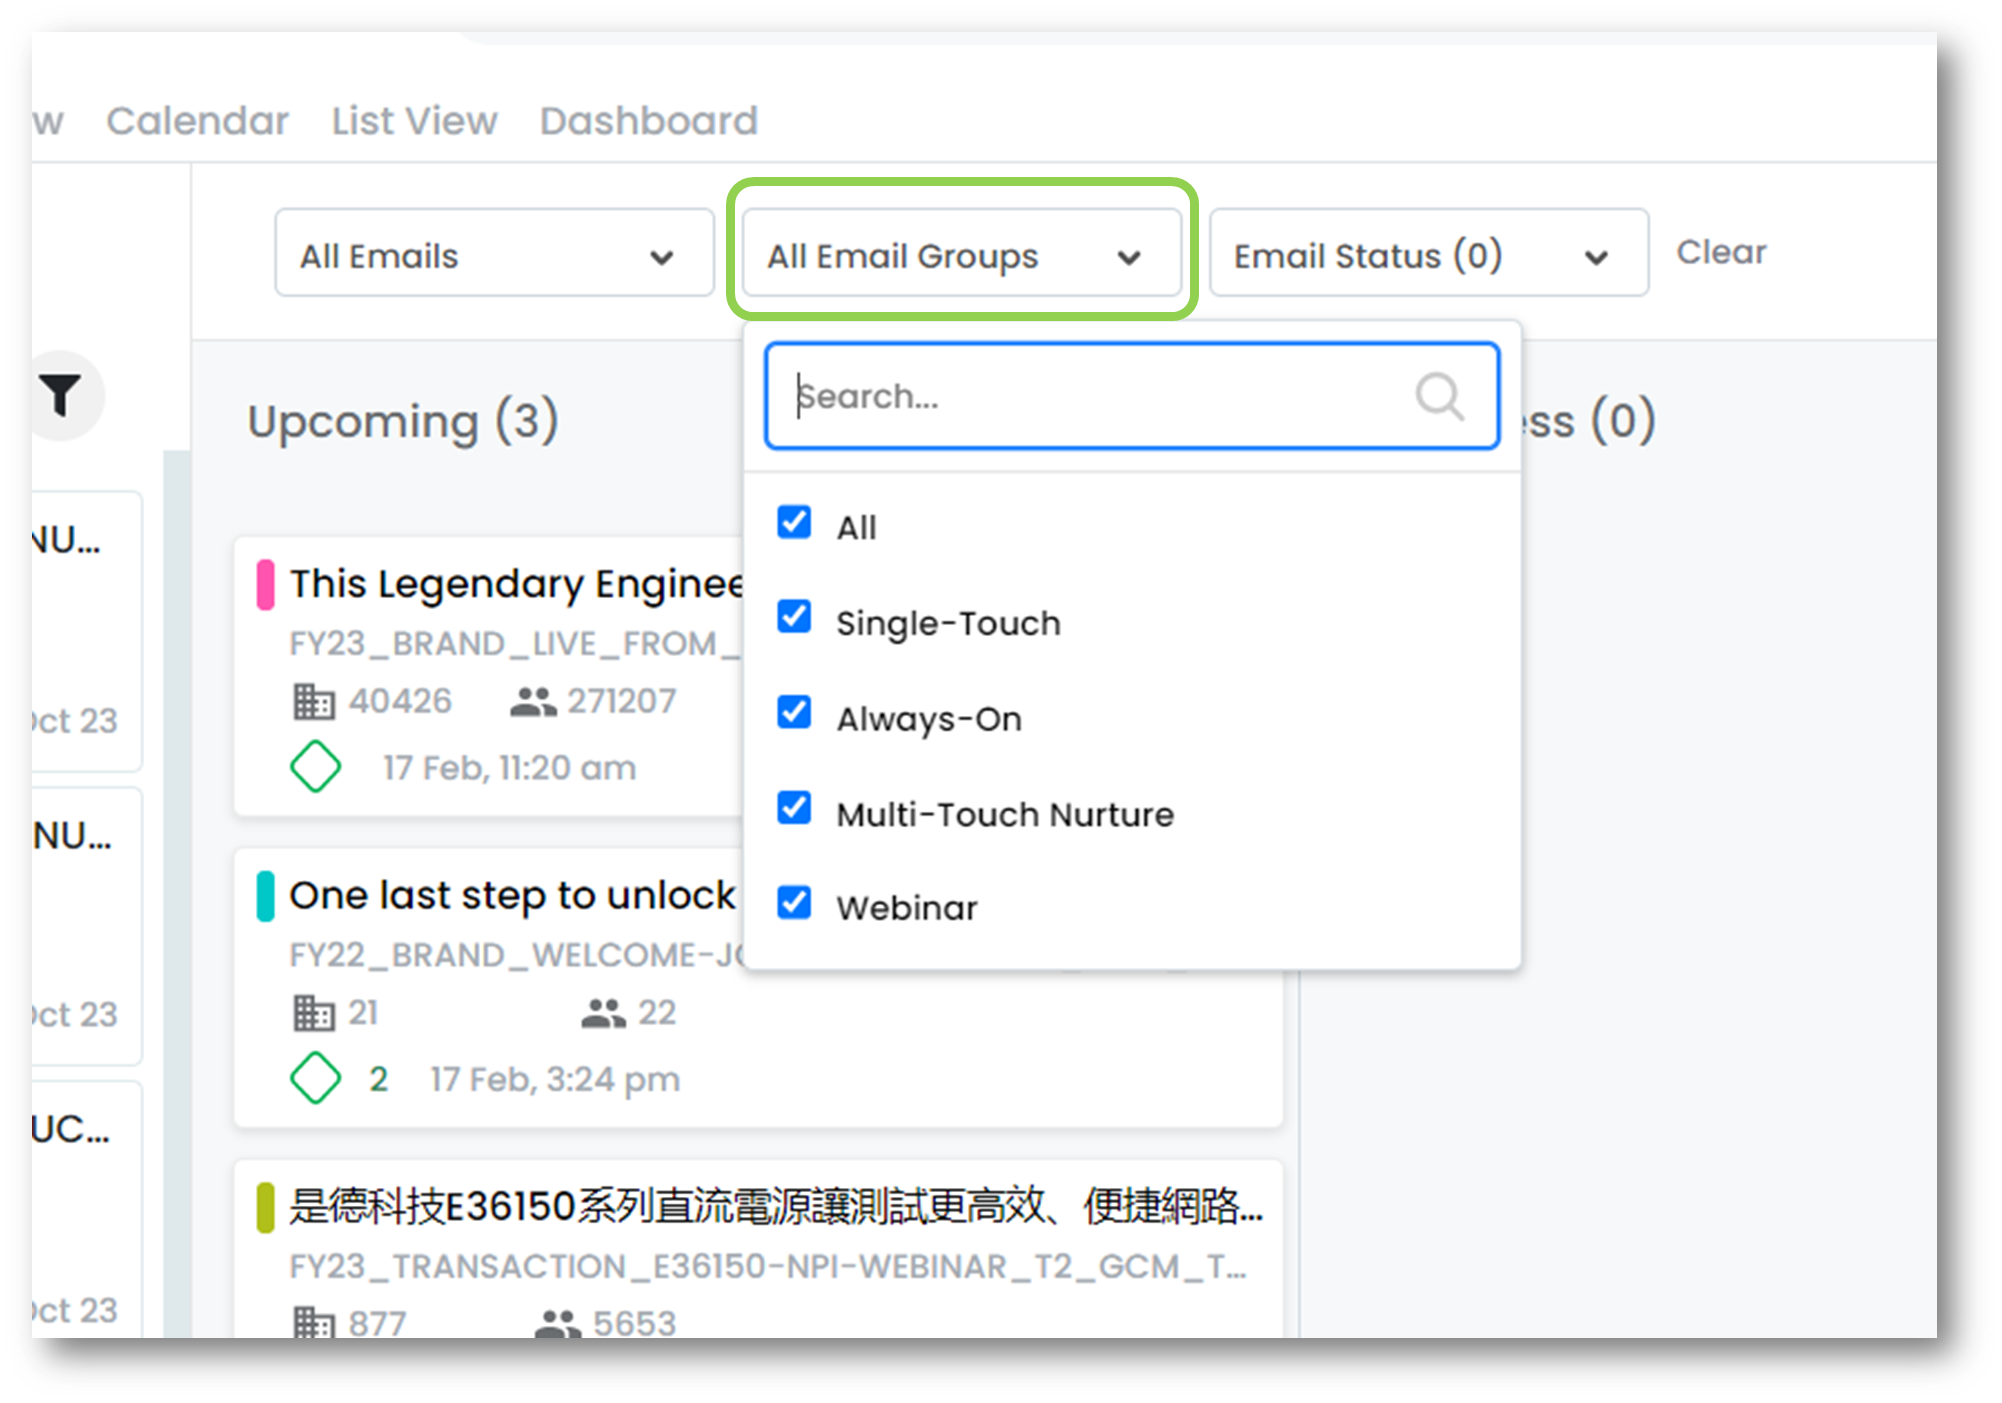 | * We can also use Eloqua’s Email Groups as a filter. * PCO (screenshot) supports multi-selection here. |
Email Filters – Email Status Filter #
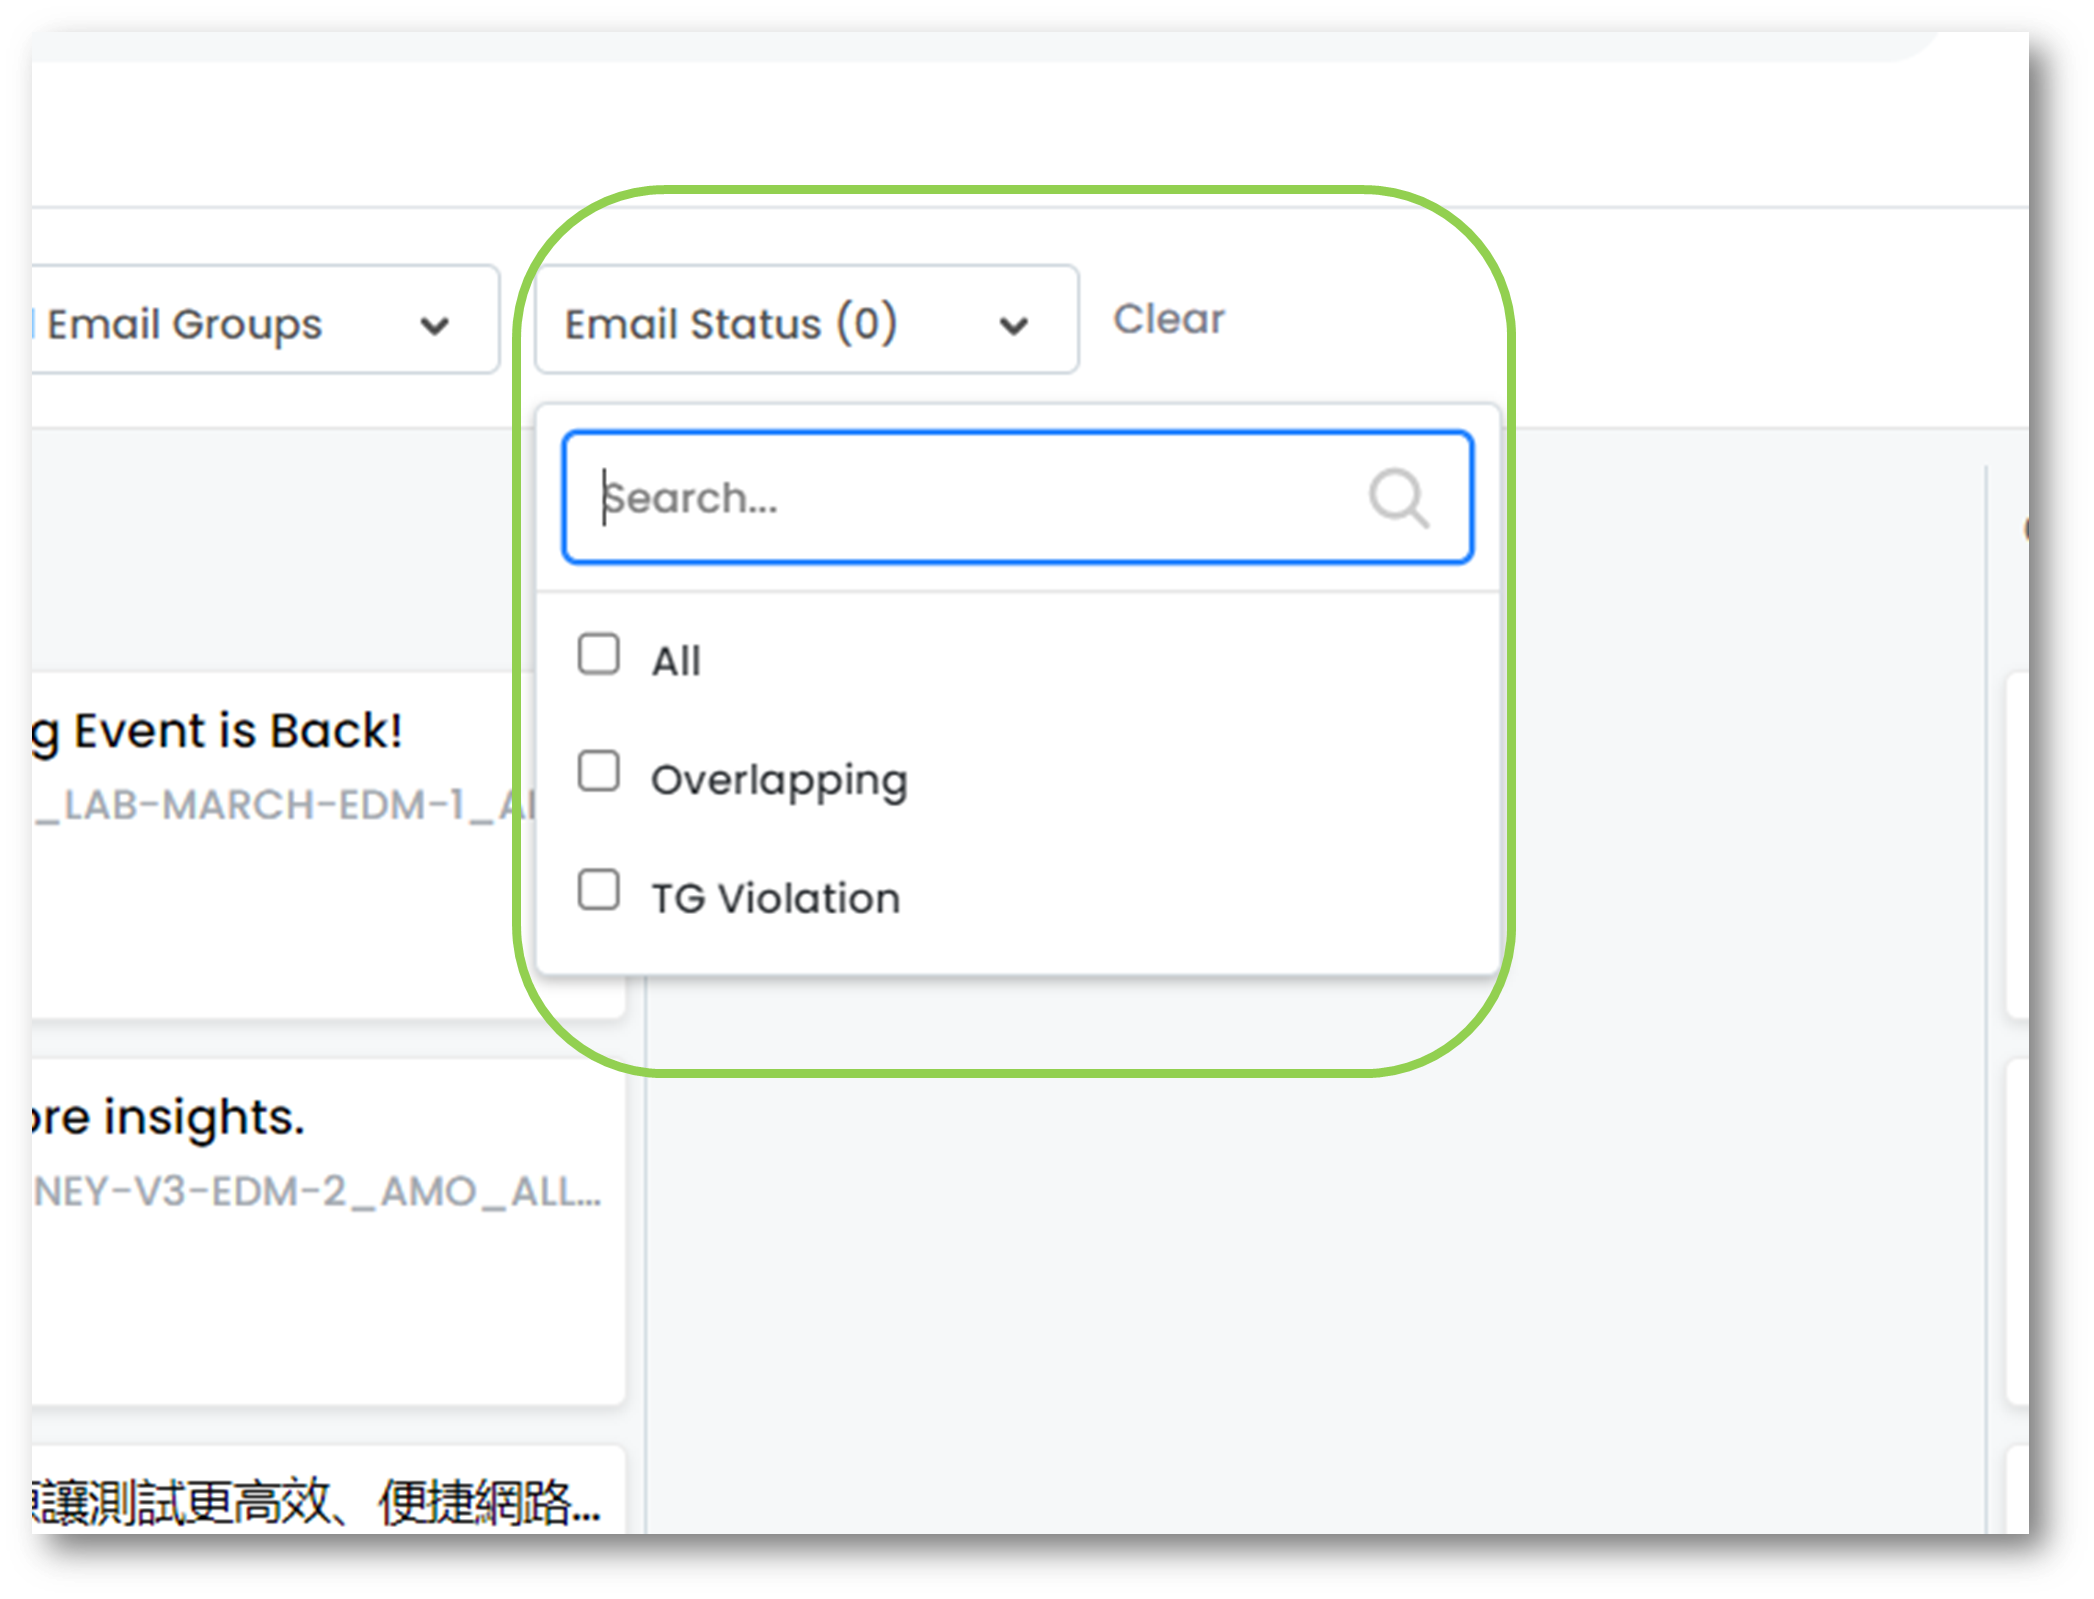 | * We can use Email Status as a filter * Email Status in PCO has Two Types: – Overlapping – When contacts receive multiple emails withing the overlapping period – TG Violation – Emails that have violated touch governance rule for at least one contact. * This filter supports multi-selection here. |
Date Filters #
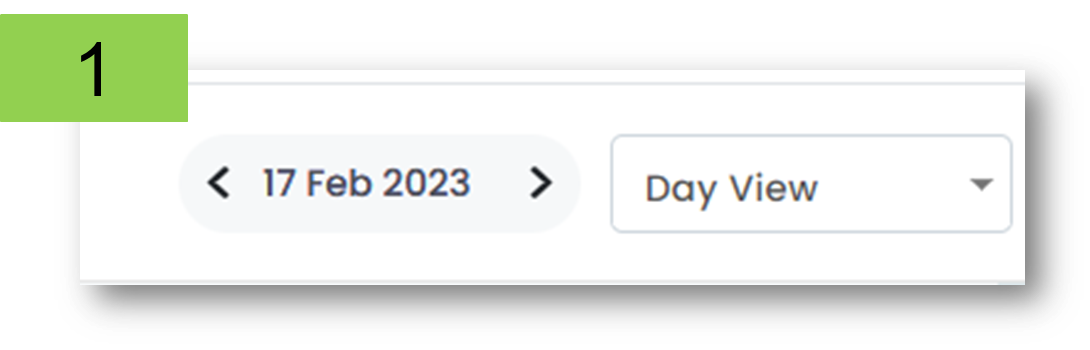 | The Date Filters are on the top right corner of board view and live view. (Screenshot #1) |
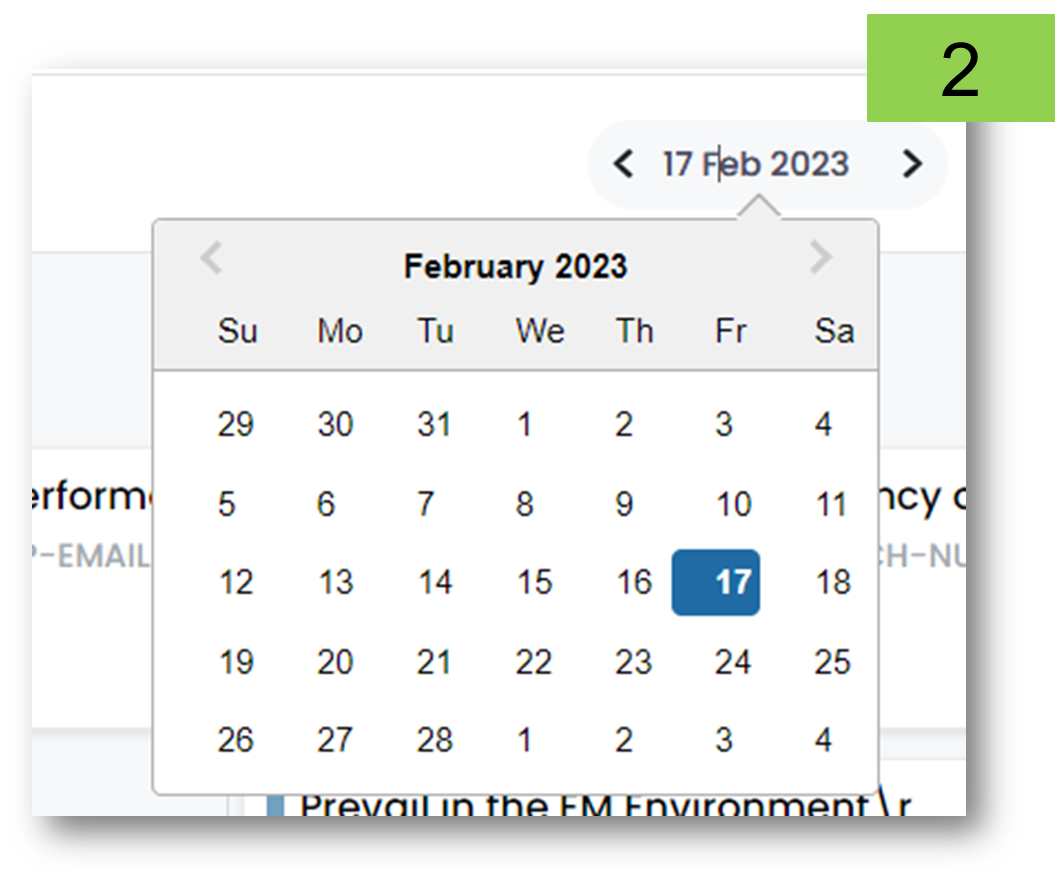 | Clicking on the date opens a calendar. PCO supports dates from the future as well as the past (Screenshot #2) |
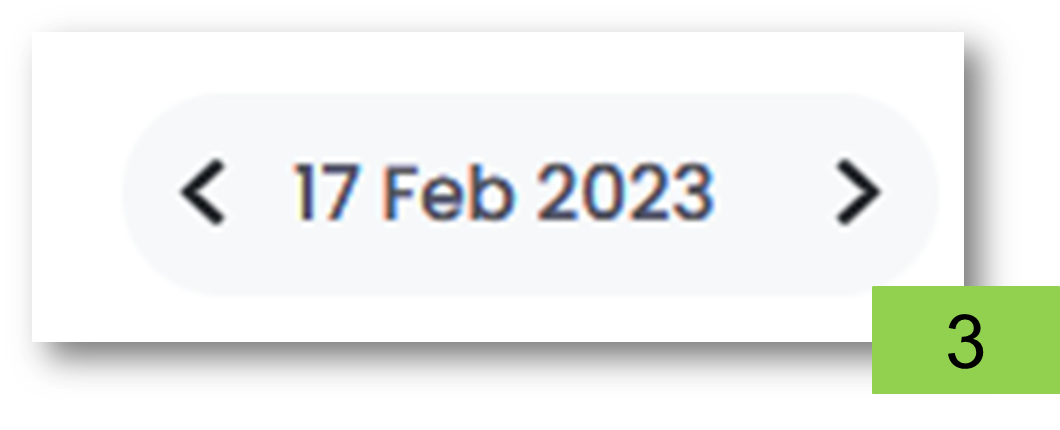 | Or we could use the arrows to move forward or backwards from the current date (Screenshot #3) |
Date Filters – Day View/Week View #
 | We can choose between Day View and Week View. (Screenshot #1) Day View is default. |
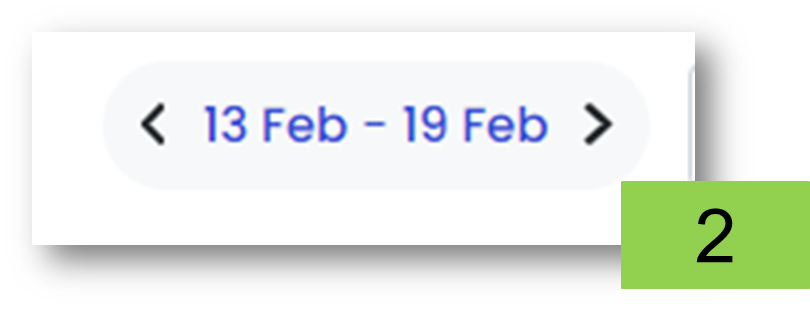 | The Week View shows emails of the chosen week. The arrows (Screenshot #2) help jump across weeks. |
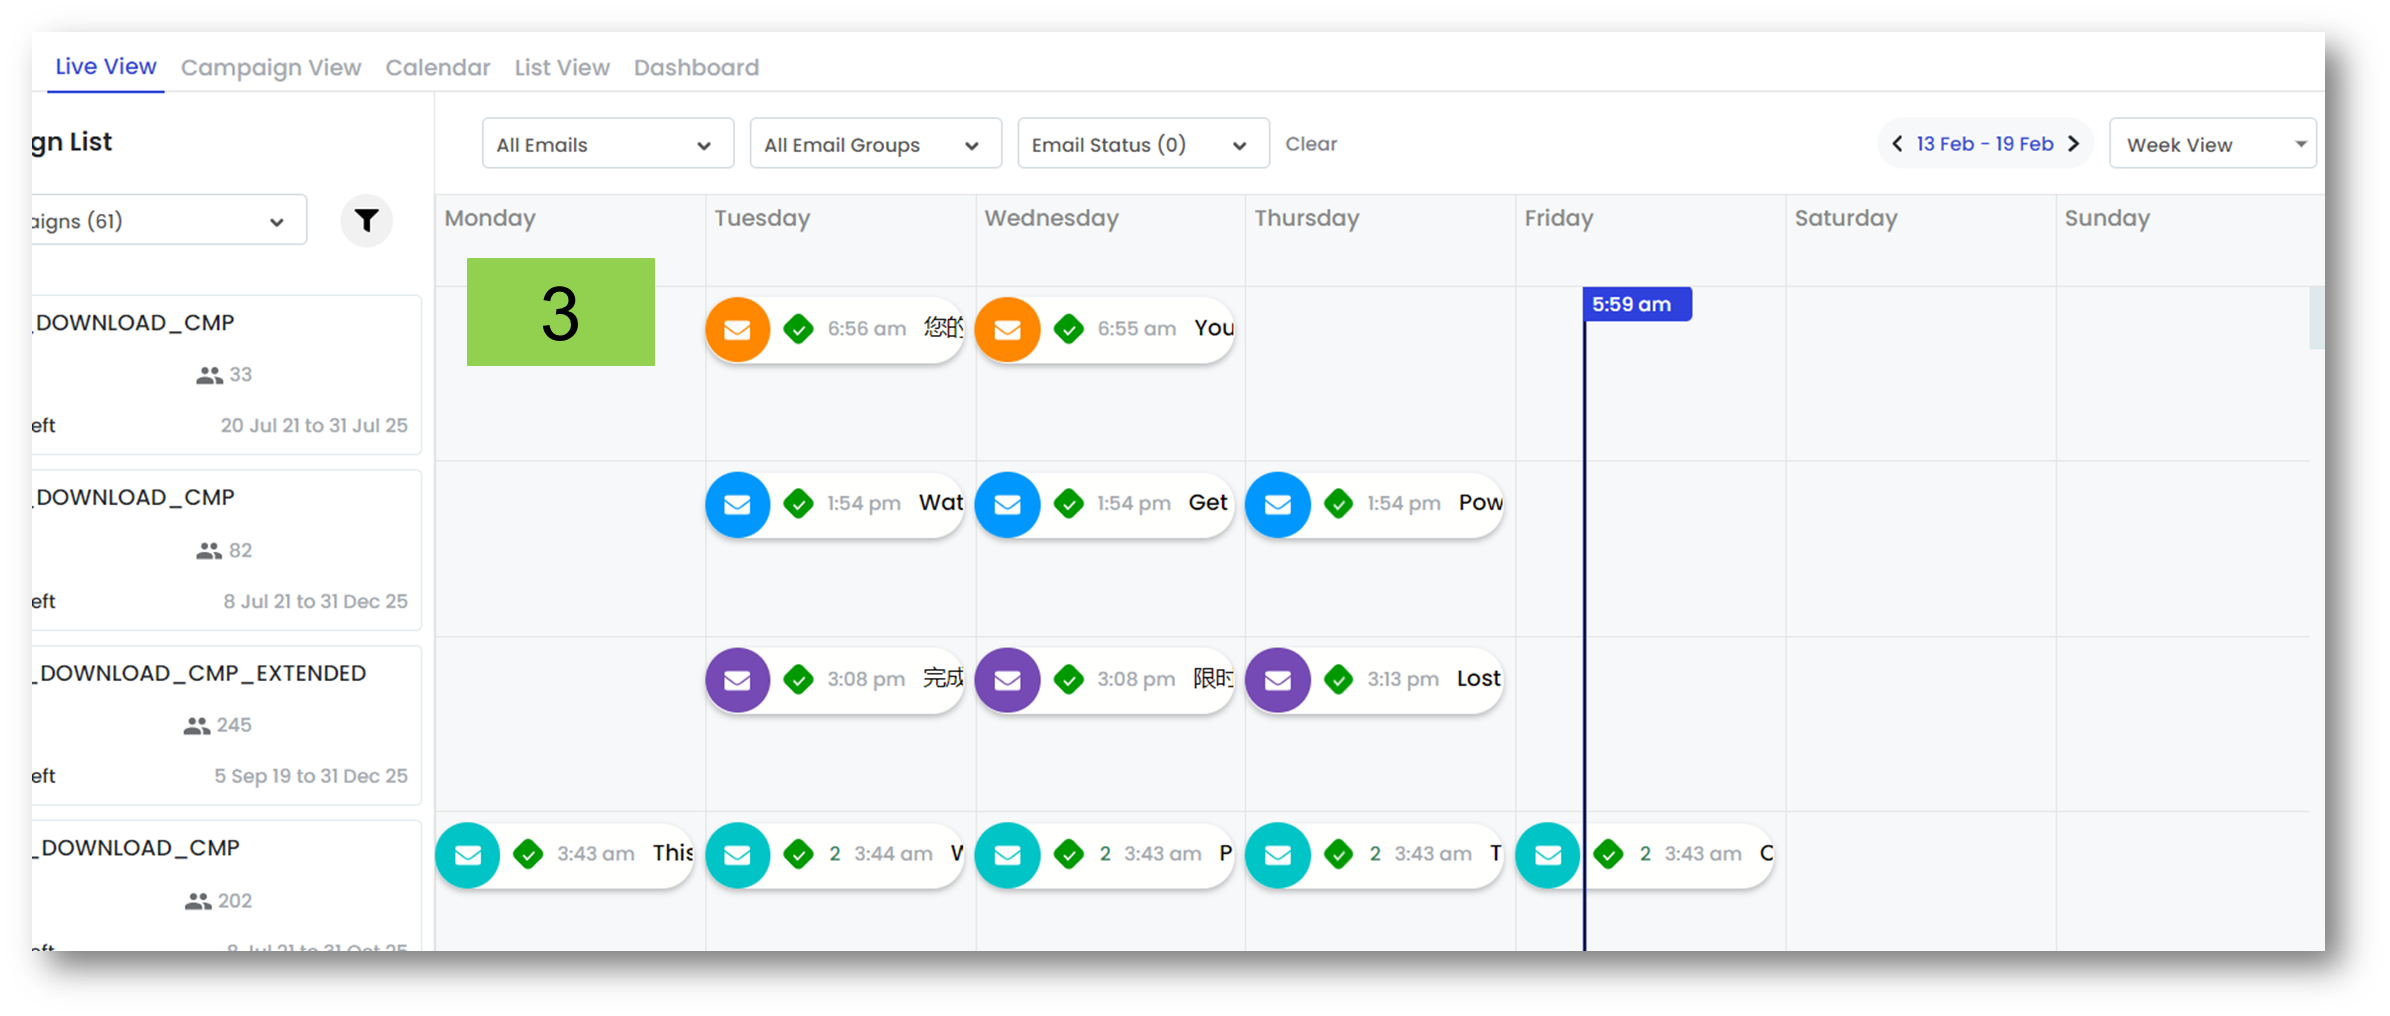 | Live View with the Week View filter looks like this: Screenshot #3 |
Note: #
These views are available on the Board View, Live View and List View.